 Save
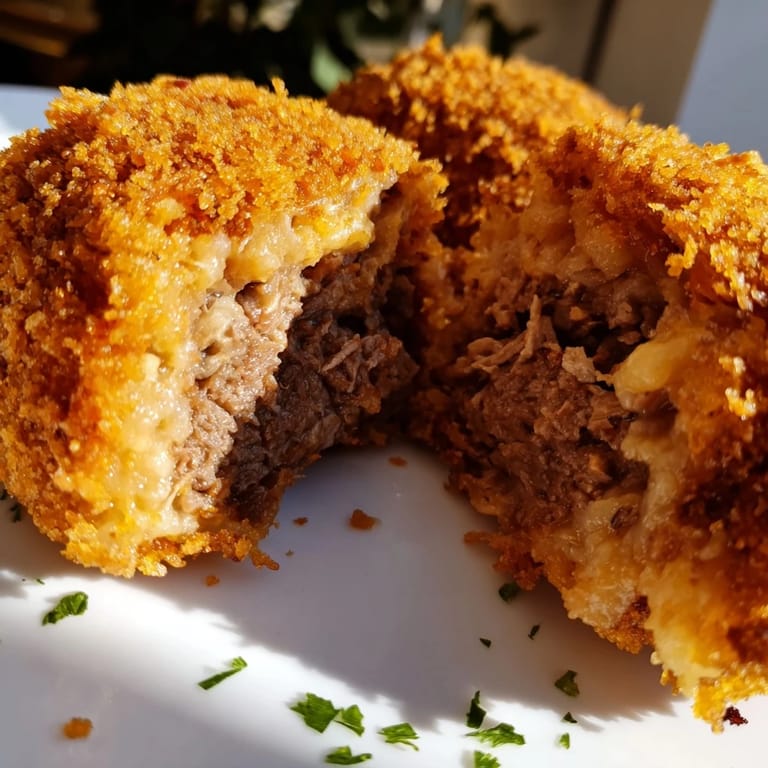
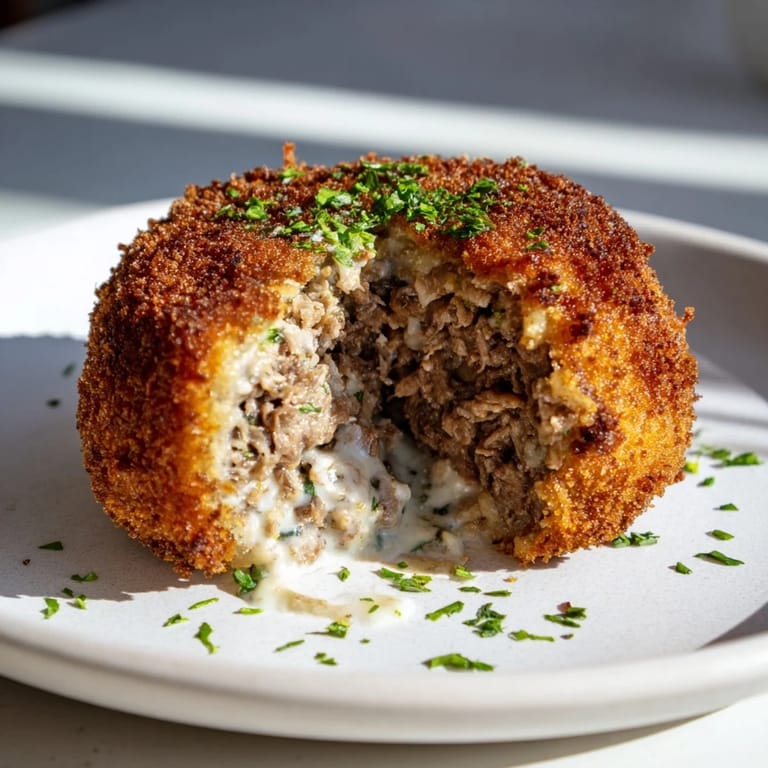
Save My first Dutch croquette was served on a rainy Amsterdam afternoon by a woman who wouldn't tell me her technique. She just smiled and watched my face as I bit through that impossibly golden crust into the warm, savory beef ragout inside. Years later, I realized those croquettes weren't magic—they were patience and technique working together. Now I make them the way she might have, with the same quiet satisfaction when someone closes their eyes at that first bite.
I made these for a dinner party once, trying to impress someone who claimed they didn't like traditional food. They ate three, asked for the recipe, and later told me those croquettes reminded them of their grandmother's kitchen. That's when I understood: good food doesn't need to be complicated to feel meaningful.
Ingredients
- Stewing beef (250g): Chuck or shoulder meat breaks down beautifully during the long simmer, creating tender shreds that disappear into the filling—avoid lean cuts that stay tough.
- Beef broth (500ml): The liquid foundation that becomes part of your ragout, so use something you'd actually drink, not a sad cube.
- Bay leaf: Just one, and don't forget to fish it out before adding the beef to your filling.
- Onion (1 small, finely chopped): Cooked until it's completely soft and sweet, adding depth without any sharp bite.
- Unsalted butter: 1 tablespoon for the beef, then 40 grams for the roux—use good butter and you'll taste the difference.
- All-purpose flour (40g for roux, plus more for coating): The roux is what transforms broth into something coating and luxurious.
- Whole milk (150ml): Creates the creamy sauce that holds everything together.
- Ground nutmeg (1/2 tsp): A whisper of warmth that makes people pause and ask what that subtle spice is.
- Fresh parsley (optional): A bright note if you want it, not essential but lovely.
- Eggs (2 large): Your binding agent in the breading station, so they need to be beaten well and not skipped.
- Fine breadcrumbs (150g): Panko or Dutch paneermeel gives you that satisfying crunch, finer crumbs than regular varieties.
- Neutral oil for frying: Sunflower or canola, enough to reach about 180°C without splashing everywhere.
Tired of Takeout? 🥡
Get 10 meals you can make faster than delivery arrives. Seriously.
One email. No spam. Unsubscribe anytime.
Instructions
- Simmer the beef until it surrenders:
- In a saucepan with beef, broth, bay leaf, and salt, bring everything to a boil, then turn it down to a gentle bubble. After about an hour, the beef will be soft enough to shred with a fork. This long cooking is what makes the filling taste developed and rich, not rushed.
- Build the base with onions and meat:
- Melt butter in a skillet and let the onion soften until it's completely translucent and sweet, then add your shredded beef. This is where you taste and adjust seasoning—trust your palate here.
- Make the roux foundation:
- In a clean saucepan, melt 40 grams of butter over low heat, then stir in flour, cooking for two minutes while stirring. This removes the raw flour taste. Gradually whisk in the reserved broth and milk so you don't get lumps, creating something smooth and thick.
- Combine everything into ragout:
- Add the beef-onion mixture to your roux along with nutmeg and parsley. Stir until completely combined and taste one more time. Spread this thick, creamy filling into a shallow dish and refrigerate for at least an hour—it needs to be firm enough to shape.
- Shape your croquettes:
- Once chilled, scoop and form the filling into cylinder shapes about 8 centimeters long. Work quickly but gently; if it gets too warm, it becomes impossible to shape.
- Set up your breading station:
- Arrange three shallow bowls with flour, beaten eggs, and breadcrumbs. Roll each croquette in flour first (this helps everything stick), dip in egg, then coat in breadcrumbs. For extra crispiness, repeat the egg and breadcrumb step once more.
- Heat oil to the right temperature:
- Use a thermometer and heat your oil to exactly 180°C—too cool and they're greasy, too hot and the outside browns before the inside warms. This precision matters.
- Fry until golden and drain:
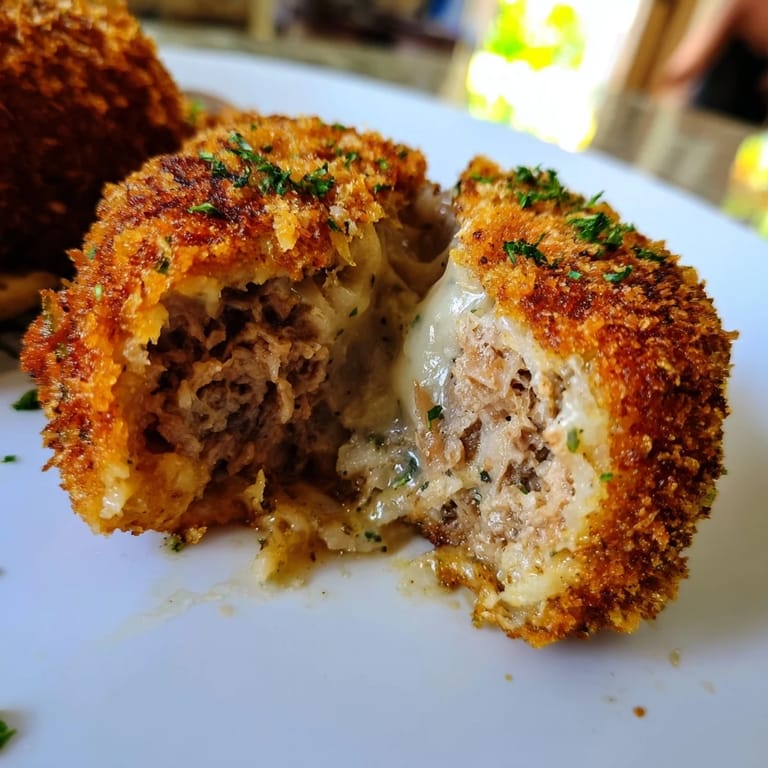
- Working in batches so the temperature stays steady, fry each croquette for 3 to 4 minutes until the outside is golden brown. Fish them out with a slotted spoon or spider strainer and place on paper towels to drain.
 Save
Save There's a moment when you pull the first croquette from the oil and it's still crackling slightly from the heat, and you know you've done something right. That moment is why people make these over and over again.
Make-Ahead Magic
One of the best things about croquettes is that you can bread them completely and freeze them for weeks. When you're ready to serve, just fry them from frozen, adding an extra minute or two to the cooking time. I've pulled a tray from my freezer at the last minute more times than I can count, and they've never let me down. This is how you go from zero to impressive appetizer in about ten minutes.
Flavor Variations to Consider
The traditional beef ragout is wonderful, but I've played with substitutions over the years. Veal mixed with beef gives a more delicate flavor, and sometimes I've added a tablespoon of tomato paste for subtle depth. You could even make a version with ham and cheese, though at that point you're creating something new rather than honoring the traditional recipe. Start with the classic version once or twice before you improvise—understand the foundation first.
Serving and Pairing
These are best served hot, straight from the oil, with cold mustard for dipping—the contrast in temperature and flavor is part of the appeal. A crisp pilsner or pale lager is the obvious pairing, but I've also found them wonderful alongside fries and a simple green salad. The Dutch serve them as casual street food, but they're elegant enough for any appetizer course.
- Serve immediately while they're still crackling and warm inside.
- Mustard, mayonnaise, or a bright pickled onion condiment all work beautifully.
- Make extra—they disappear faster than you'd expect.
 Save
Save Dutch croquettes are comfort food with discipline, where technique creates texture and patience creates flavor. Make them once and you'll understand why they've stayed beloved for generations.
Recipe FAQs
- → How do I achieve a creamy filling?
Slowly simmering beef until tender and combining it with a roux made from butter, flour, and milk ensures a smooth, creamy texture inside the croquettes.
- → What is the best way to shape croquettes?
Chill the filling until firm, then shape it into cylindrical forms, roughly 8 cm long, for even frying and a classic appearance.
- → Can I prepare croquettes in advance?
Yes, croquettes can be breaded and frozen before frying. Fry them from frozen, adding extra minutes to cooking time for best results.
- → What oil is recommended for frying?
Use neutral oils with high smoke points like sunflower or canola oil to achieve a crisp, golden crust without strong flavors.
- → How to ensure croquettes are crispy outside and soft inside?
Double-coating with eggs and breadcrumbs and frying at the right temperature (180°C/350°F) creates a crunchy exterior while maintaining a tender filling.