Save
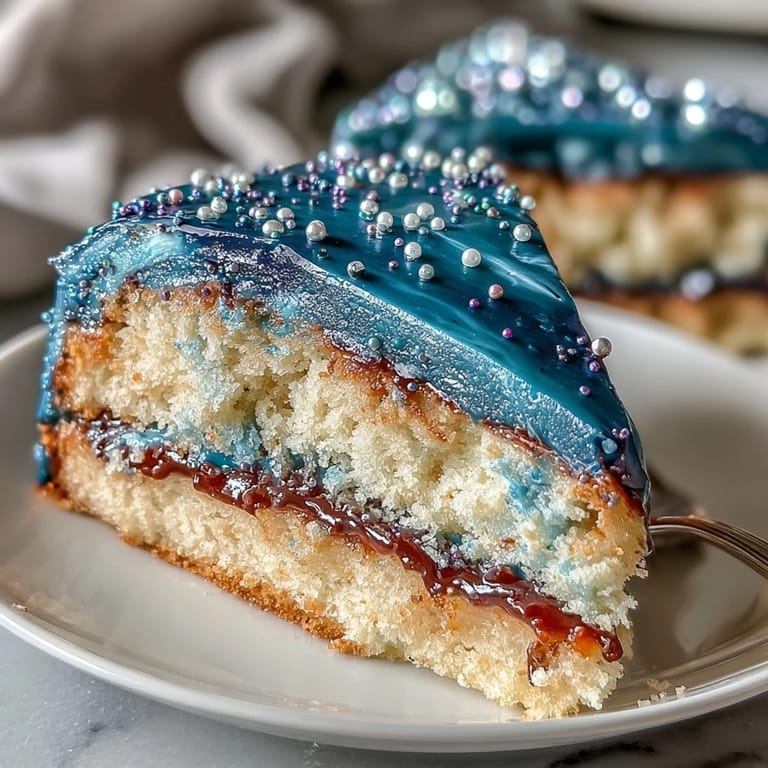
Save There's something magical about baking a cake that looks like it fell straight from the night sky. My friend mentioned her birthday was coming up, and when she told me she was a Pisces, I immediately pictured layers of swirling blues and purples studded with glitter catching the light. That first time I mixed those galaxy colors into buttercream, watching them blend and shift like nebulas across the bowl, I knew this cake was going to be something special.
I'll never forget sliding that finished cake onto the dessert table and watching the way the edible glitter caught everyone's phone flashlights during the surprise party. Someone actually gasped, and my friend teared up a little—not just because it was pretty, but because someone had bothered to make something so deliberately hers. That's when I realized this cake isn't just about celestial aesthetics; it's about showing up for people in the most delicious way.
Ingredients
- All-purpose flour (2 ½ cups): The backbone of a tender crumb; make sure it's measured correctly or your cake can turn dense, so spoon and level rather than scooping directly from the bag.
- Baking powder (2 ½ tsp): This creates the lift that keeps your layers delicate and cloud-like, not heavy.
- Salt (½ tsp): A tiny pinch that makes vanilla taste more like vanilla—don't skip it even though it's small.
- Unsalted butter (1 cup for sponge, 1 ½ cups for frosting): Room temperature butter creams properly and incorporates air; cold butter leads to lumpy frosting and dense cake.
- Granulated sugar (2 cups): Creaming sugar with butter is your first step to building structure and texture in the cake.
- Eggs (4 large): Room temperature eggs emulsify smoothly into the butter mixture; cold eggs break the emulsion and make the batter curdle.
- Pure vanilla extract (1 tbsp for sponge, 2 tsp for frosting): Real vanilla deepens the flavor so your cake tastes elegant, not one-note.
- Whole milk (1 cup for sponge, ¼ cup for frosting): The acid in milk tenderizes the crumb; it's the secret weapon that makes this cake stay moist for days.
- Powdered sugar (5 cups): Sifted powdered sugar prevents lumps and creates silky, spreadable frosting without gritty texture.
- Gel food coloring (navy blue, purple, black, teal): Gel colors don't thin your frosting the way liquid colors do, so your buttercream stays perfectly spreadable.
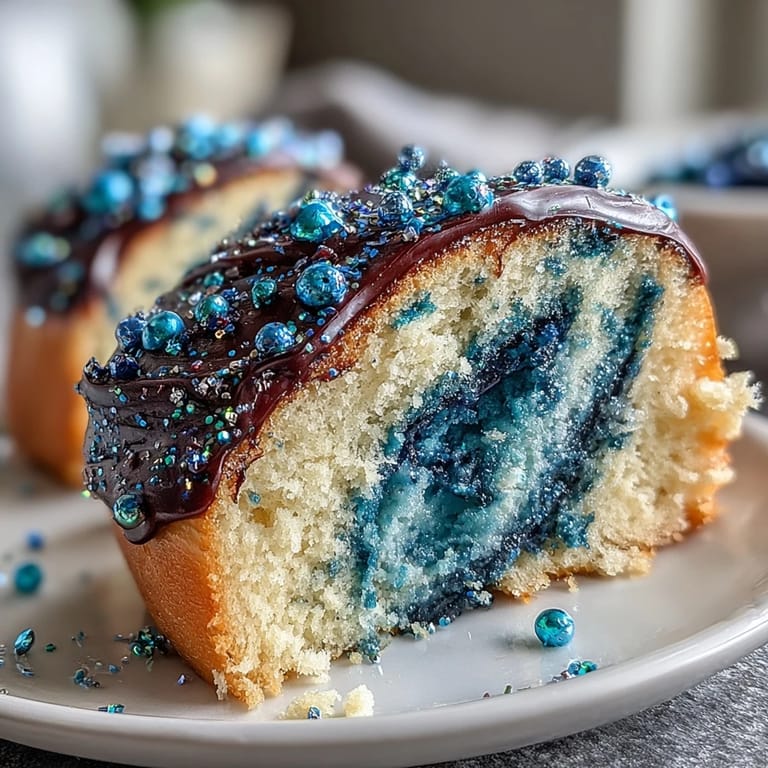
- Edible glitter (silver, blue, or iridescent): The moment where your cake transforms into something magical—buy quality edible glitter so it actually sparkles.
Tired of Takeout? 🥡
Get 10 meals you can make faster than delivery arrives. Seriously.
One email. No spam. Unsubscribe anytime.
Instructions
- Prepare your stage:
- Preheat your oven to 350°F and grease those three 8-inch pans with butter, then line the bottoms with parchment paper so your layers slide out cleanly. Have all your ingredients measured and at room temperature before you start—this is the secret to avoiding lumpy cakes.
- Build your dry base:
- Whisk flour, baking powder, and salt together in a medium bowl until they're evenly combined. This distributes the leavening so your cake rises uniformly.
- Cream butter and sugar into clouds:
- Beat room-temperature butter and sugar for 3-4 minutes until it's pale, fluffy, and practically doubled in volume. You're literally beating air into it, which creates structure as the cake bakes.
- Add eggs with care:
- Drop in one egg at a time, beating well after each addition so it fully incorporates before the next one lands. This prevents the batter from splitting and becoming curdled.
- Mix in your vanilla:
- Pour in the vanilla extract and beat until it vanishes into the batter.
- Alternate wet and dry in thirds:
- Start with a third of the flour mixture, beat until just combined, then add half the milk, then another third of flour, then the remaining milk, then the last of the flour. Always begin and end with flour to protect the structure you've built.
- Distribute and bake:
- Divide batter evenly among your three pans and smooth the tops. Bake for 25-30 minutes until a toothpick inserted in the center comes out clean; the tops should spring back slightly when touched.
- Cool with patience:
- Let cakes rest in pans for 10 minutes so they set, then turn them out onto cooling racks and let them cool completely. A warm cake cracks when frosted, so don't rush this step.
- Whip your frosting base:
- Beat room-temperature butter until creamy, then gradually add sifted powdered sugar, milk, and vanilla. Keep beating until it's smooth, fluffy, and spreadable like clouds.
- Paint your galaxy:
- Divide frosting into four bowls and tint each one with your gel colors—navy, purple, teal, and black—stirring until the color is even and rich. A toothpick dipped in gel color goes a long way.
- Layer and swirl:
- Place your first cake layer on a serving plate or cake board, then spread frosting on top. Layer your second cake, frost again, then add the third layer. Now comes the fun part: alternate dollops of each colored frosting around the sides and top, then use an offset spatula to swirl them gently together, mimicking nebula clouds.
- Make it shine:
- Sprinkle edible glitter generously over the top and down the sides while the frosting is still soft enough to catch it. If you're adding fondant Pisces symbols or stars, press them gently into the frosting now.
- Set and serve:
- Chill the finished cake for at least 30 minutes so the frosting firms up and the design sets before slicing. This also makes cutting cleaner and prevents smudging.
 Save
Save The most rewarding part of baking this cake isn't the final shimmer—it's watching someone's face light up when they realize the whole thing is edible and not just decoration. There's a moment when expectation and reality collide, and that's where the real magic lives.
The Science of Swirled Frosting
Buttercream is forgiving in ways that most other frostings aren't, which is exactly why it's perfect for galaxy designs. The key is understanding that gel colors don't alter the consistency of your frosting the way liquid colors do—they just tint it. When you dollop different colors onto a cake layer and swirl them together with an offset spatula, you're creating a visual blend that suggests depth and movement without needing any special technique. The beauty is in the imperfection; a nebula isn't meant to be perfectly blended anyway.
Working with Edible Glitter
There's a trick I learned the hard way: edible glitter clings better to frosting that's still slightly soft. If you wait too long after applying frosting, the glitter will sit on top like jewelry instead of nestling into the surface and catching the light from inside. Some people brush on a tiny bit of clear vodka or almond extract before sprinkling, which adds shine and helps the glitter adhere. The difference between glitter that looks flat and glitter that looks truly magical is often just a matter of timing and a light mist.
Flavor Customizations and Pairings
The vanilla sponge is a canvas, so feel free to paint with it. I've made this cake with almond extract instead of vanilla, and it takes on a completely different personality—more sophisticated, slightly floral. Some bakers add a teaspoon of lemon zest to brighten the crumb, or even swap the milk for buttermilk for extra tang. The frosting is equally flexible; you could add a half-teaspoon of peppermint extract for a winter version, or a touch of lavender to lean into the Pisces water-sign magic.
- Pair slices with sparkling Moscato or a dry champagne for elegant presentations.
- Serve with fresh berries on the side to add tartness and visual contrast.
- This cake stays moist for up to four days when wrapped and refrigerated, making it perfect for baking ahead.
 Save
Save This cake is about celebrating someone in a way that feels personal and intentional, whether they believe in the stars or just love good cake. Bake it with the knowledge that you're creating a moment, not just a dessert.
Recipe FAQs
- → How do I achieve the galaxy swirl effect?
Divide the buttercream into separate bowls and tint each with food coloring in galaxy hues. Spoon alternating dollops onto cake layers and gently swirl with a spatula for a marbled appearance.
- → Can I prepare the cake ahead of time?
Yes, you can bake the sponge layers and prepare the buttercream a day in advance. Assemble and chill the cake before serving for best results.
- → What substitutes work for vanilla extract?
Almond extract offers a nice flavor twist, or you may omit it for a more neutral vanilla sponge.
- → How to apply edible glitter effectively?
Brush a light layer of clear alcohol or syrup over the cake surface before sprinkling glitter to help it adhere and sparkle.
- → Is this suitable for gluten-sensitive diets?
Gluten-free flour can replace all-purpose flour to accommodate gluten sensitivities without altering the method.